Dark Style HDR Photography - Bracketing Images
[ Previous Page ] - [ Next Page ]
// The Method of Dark Style HDR Photography //
- Shoot a series of "bracketed images"
- Combine the images & create an HDR image
- Tweak levels (Photoshop)
- Add Curves / contrast (Photoshop)
- Add Black & White + Bleach bypass filter (Photoshop + Tiffen plug-in)
// Full Steps with Explanation //
1. Bracketed Images
You will first need to start by capturing a series of bracketed images (of the same subject). To do this you will need to use a tripod, so that the camera does not move between shots.
I will be showing you how to do this using my Nikon D300.
Nikon D300 Exposure Bracketing
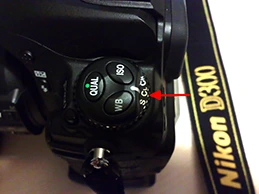
1. (a) Press and HOLD the 'Fn' button as indicated in the below image. (This is done while holding the camera and pressing the button with your 4th finger).

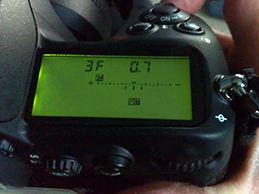
1. (b) When the Fn button is held in, the exposure bracketing screen will appear on the Top Panel, similar to the image below.
Tip! Hold down the Fn button while rotating the rear command dial until [BKT] appears in the top LCD. When this icon is displayed, exposure bracketing is active. My current settings will take 3 images (denoted as "3F"), bracketing at 0.7, which will give me 1 image correctly exposed, 1 underexposed by 0.7, and 1 overexposed by 0.7.
NOTE: Turning the rear command dial to the right when (0F) is displayed will bracket either side and include a correctly exposed image (which is what we want). If you turn the dial to the left, you will get variants of overexposing or underexposing only (which is not what we want).
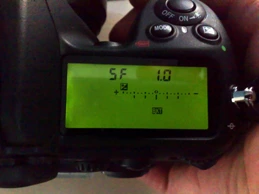
1. (c) By rotating the front control dial to the left with my index finger, I can increase the bracketing to 1.0 (which will give a greater range between the bracketed images).

1. (d) By rotating the rear command dial to the right with your thumb, you can change the number of images to be taken. I have now selected 5 shots (5F) to be bracketed as seen in the image below.
1. (e) You can now release the Fn button, and the display will now show the exposure bracketing gauge along with the other camera settings, as seen below.

1. (f) // Additional Camera Settings // You will need to shoot in RAW format and not webP as you want to record as much information in your image as possible.
- Always shoot in "Aperture Priority"
- Set focus to "Manual" so that the camera does not refocus between shots.
- Set your aperture to "f/8" or larger to get a deep DOF (depth of field).
- Select a low ISO setting (e.g., 200).
- Select Continuous Low (CL) shutter release, so that the camera will automatically vary the shutter speed and shoot the scene at the different exposures automatically when you fire the shutter. You can either use a remote release or set the self-timer to take the shots.
- Note: if you select (S) single shot, you will have to press the shutter button for each of the bracketed images you have selected, i.e., as we have selected (5F) in image 'e' above, we would have to press the shutter 5 times to complete the bracketed shot set (which is not what we want to be doing).
2. Combine Images into an HDR Image
Once you have done this, you will need to create your HDR image. Please click the following link to see how this is done using PhotoMatix.
Photomatix tutorial link(Please note: this will open up in a new browser window).
Photomatix Settings I Used for This Tutorial Image
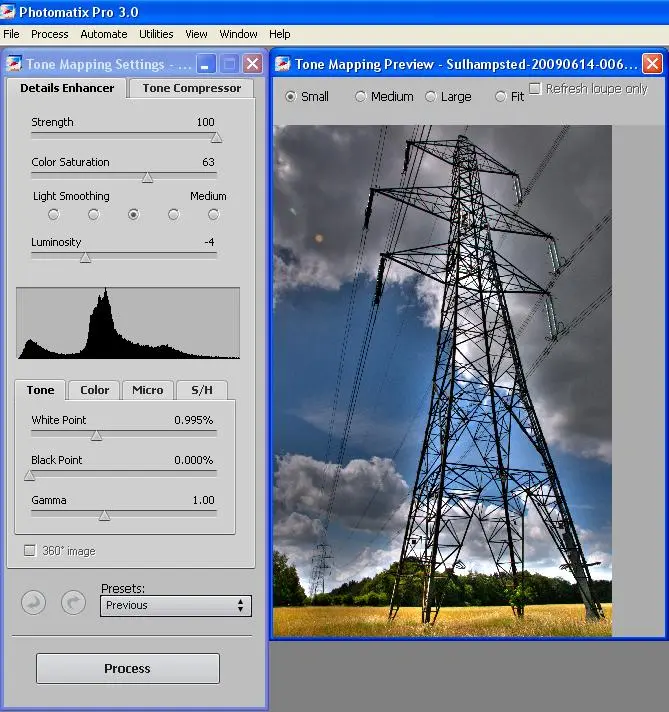
As no two images are the same, the settings for your image will probably be different from mine, and you will need to tweak the settings to suit.
NOTE: As you change the settings, keep checking the image to see how the changes affect it. Try to avoid too much of a "Halo" (localized brightening to the extremities of an object) around objects within your image, i.e., tree lines against the sky. You can see a mild Halo effect around the power pylon in my image.
Tips!
- Strength: Adjusting the Strength slider to a value below 100 should help lessen the Halo effect (The actual value you will require can only be decided by trying different values until you are happy that it is not too apparent).
- Light Smoothing: Also, I try to keep the Light Smoothing set to Medium (or higher) to avoid creating Halos. Once again, you will need to just try the different settings for light smoothing to see what best suits your image.
- Luminosity: A higher value will brighten the shadows and increase local contrast.
- Histogram: As you can see from the histogram, the image has a full tonal range. If yours does not fill it fully, you can adjust the White Point to move the right side of the graph to the right edge of the histogram window. Then do the same with the Black Point to move the graph to the left edge of the histogram window, which will give you the full tonal range for your image.
- Gamma: Adjusts the mid-tone of the tone-mapped image, brightening or darkening the image globally.
So now you know how to adjust your image. Just play with the settings until you are happy with it. Then click the (Process) button and save the image out as a 16-bit TIFF image.
After you have created your HDR image, please click below for Step 3.
NEXT STEP![]()
Copyright MRD Photography - Mark Dunn